Authelia 설치 및 NPM 연동 가이드 2부로 이어갑니다. 번호는 계속 이어집니다.
3) Authelia 환경 설정 #1 - 샘플 configuration.yml 다운로드 및 생성
주의! 기존 가이드와 달리 Authelia 환경 설정은 text modify가 많아서 조금 복잡합니다.
천천히 가이드를 따라서 세팅을 진행해 보시고, 막히거나 에러 나는 부분이 있으면
글 맨 마지막에 있는 youtube 영상을 참고해보시기 바랍니다.
3-1) https://dbt3ch.com/books/authelia-for-nginx-proxy-manager/page/configurationyml 접속
3-2) 1~96 라인까지 전부 드래그해서 복사 (CTRL + C)
// "더보기"의 빨간색(red) 표시된 부분을 개인 서버 환경에 맞게 설정하세요.
| # yamllint disable rule:comments-indentation --- ############################################################################### # Authelia Configuration # ############################################################################### theme: dark #light/dark jwt_secret: 1234567890abcdefghifjkl #any text or number you want to add here to create jwt Token default_redirection_url: https://google.com/ #where to redirect for a non-existent URL server: host: 0.0.0.0 port: 9091 path: "" read_buffer_size: 4096 write_buffer_size: 4096 enable_pprof: false enable_expvars: false disable_healthcheck: false tls: key: "" certificate: "" log: level: debug totp: issuer: yourdomain.com #your authelia top-level domain period: 30 skew: 1 authentication_backend: disable_reset_password: false refresh_interval: 5m file: path: /config/users_database.yml #this is where your authorized users are stored password: algorithm: argon2id iterations: 1 key_length: 32 salt_length: 16 memory: 1024 parallelism: 8 access_control: default_policy: deny rules: ## bypass rule - domain: - "auth.yourdomain.com" #This should be your authentication URL policy: bypass - domain: "yourdomain.com" #example domain to protect policy: one_factor - domain: "sub1.yourdomain.com" #example subdomain to protect policy: one_factor - domain: "sub2.yourdomain.com" #example subdomain to protect policy: one_factor - domain: "*.yourdomain.com" #example to protect all subdomains under top-level domain policy: one_factor #add or remove additional subdomains as necessary. currenlty only supports ONE top-level domain #any time you add a new subdomain, you will need to restart the Authelia container to recognize the new settings/rules session: name: authelia_session secret: unsecure_session_secret #any text or number you want to add here to create jwt Token expiration: 3600 # 1 hour inactivity: 300 # 5 minutes domain: yourdomain.com # Should match whatever your root protected domain is regulation: max_retries: 3 find_time: 10m ban_time: 12h storage: local: path: /config/db.sqlite3 #this is your databse. You could use a mysql database if you wanted, but we're going to use this one. encryption_key: you_must_generate_a_random_string_of_more_than_twenty_chars_and_configure_this #added Dec 5 2021 notifier: disable_startup_check: true #true/false smtp: username: youremail@gmail.com #your email address password: Y0uRp@55W0rD! #your email password host: smtp.gmail.com #email smtp server port: 587 #email smtp port sender: youremail@gmail.com identifier: localhost subject: "[Authelia] {title}" #email subject startup_check_address: youremail@gmail.com disable_require_tls: false disable_html_emails: false tls: skip_verify: false minimum_version: TLS1.2 |
3-3) $ touch ./volume/config/configuration.yml
3-4) $ vim ./volume/config/configuration.yml
3-5) 웹사이트에서 복사한 1~96라인 내용 붙여넣기 (CTRL + V)
4) Authelia 환경 설정 #2 - 다운로드한 configuration.yml을 개인 서버 환경에 맞게 수정
// 예시의 굵게(bold) 설정된 부분을 개인 서버 환경에 맞게 설정하세요.
4-1) [7라인] theme: 값을 원하는 테마로 수정 (dark or light)
예) theme: dark
4-2) [8라인] jwt_secret: 값의 문자열을 랜덤하게 수정 (길고 어려울수록 보안에 좋음)
예) jwt_secret: sdfl47#@w67kwekfd23Hfslksa143!@#$5dlfsSDJ$!@#ALS21HOkdadkfjhaskl
4-3) [10라인] default_redirection_url: 값을 auth.<도메인 주소>로 설정
예) default_redirection_url: https://auth.test1234.duckdns.org
4-4) [29라인] issuer: 값을 <도메인 주소>로 설정
예) issuer: test1234.duckdns.org
4-5) [49~62라인] rules: 하위의 domain: 값을 bypass와 one_factor 2가지 타입으로 설정
예) authelia 접속 주소는 bypass 설정하고, 그 외에 모든 sub 도메인을 one_factor로 설정
- domain: "auth.test1234.duckdns.org"
policy: bypass
- domain: "*.test1234.duckdns.org"
policy: one_factor
4-6) [59라인] domain: 값을 <도메인 주소>로 설정
예) domain: test1234.duckdns.org
4-7) [69라인] encryption_key: 값의 문자열을 랜덤하게 수정 (길고 어려울수록 보안에 좋음)
예) encryption_key: dsafkl!@#ja758f#lkwk$@$@E42FKDdj524sW@43!FE%fkjdfA59dfolsfxcl
4-8) [71~86라인] email 알림 설정을 위한 smtp 메일 발송 설정
예) naver 메일로 smtp 발송 설정 (one_factor 사용 시 생략 가능, two_factor 적용하려면 smtp 메일 세팅 필수)
smtp:
username: <NAVER_ID>@naver.com
password: <NAVER_PW>
host: smtp.naver.com
port: 587
sender: <NAVER_ID>@naver.com
startup_check_address: <NAVER_ID>@naver.com
5) Authelia 환경 설정 #3 - 로그인을 위한 위한 암호 설정을 위해 HASH 생성
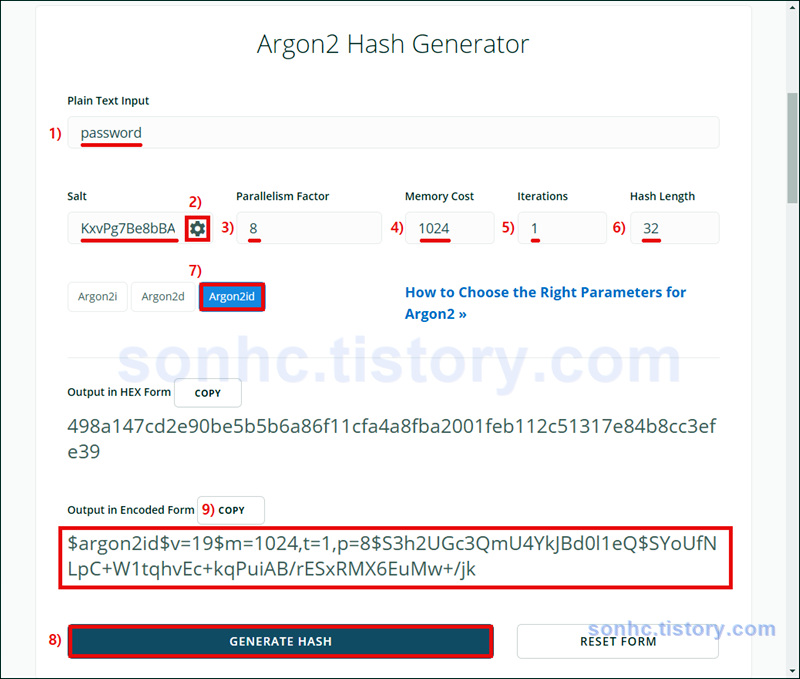
5-1) https://argon2.online/ 접속
5-2) 암호 HASH 생성을 위한 정보 입력
- 1) Plain Text Input : 원하는 암호 입력 (예: password)
- 2) Salt : "Generate Random Salt" 톱니 아이콘 클릭 -> 랜덤으로 salt 값 생성됨
- 3) Parallelism Factor : 8
- 4) Memory Cost : 1024
- 5) Iterations : 1
- 6) Hash Length : 32
- 7) How to Choose the Right Parameters for Argon2 : "Argon2id" 선택
5-3) 8) GENERATE HASH 버튼 클릭 -> 9) "Output in Encoded Form" 표시된 내용 복사해 놓기

6) Authelia 환경 설정 #4 - 샘플 users_database.yml 다운로드 및 생성
6-1) https://dbt3ch.com/books/authelia-for-nginx-proxy-manager/page/users-databaseyml 접속
6-2) 1~16 라인까지 드래그해서 복사 (CRTL + C)
// "더보기"의 빨간색(red) 표시된 부분을 개인 서버 환경에 맞게 설정하세요.
| users: user1: #username for user 1. change to whatever you'd like displayname: "User Name 1" #whatever you want the display name to be password: "$argon2i$v=19$m=1024,t=1,p=8$eTQ3MXdqOGFiaDZoMUtMVw$OeHWQSg9zGKslOepe5t4D1T9BZJjHA1Z+doxZrZYDgI" #generated at https://argon2.online/ email: youremail@gmail.com #whatever your email address is groups: #enter the groups you want the user to be part of below - admins - dev user2: #username for user 2. change to whatever you'd like. Or delete this section if you only have 1 user displayname: "User Name 2" #whatever you want the display name to be password: "$argon2i$v=19$m=1024,t=1,p=8$eTQ3MXdqOGFiaDZoMUtMVw$OeHWQSg9zGKslOepe5t4D1T9BZJjHA1Z+doxZrZYDgI" #generated at https://argon2.online/ email: youremail2@gmail.com #whatever your email address is groups: #enter the groups you want the user to be part of below - dev #any time you add a new user, you will need to restart the Authelia container to recognize the new settings/rules |
6-3) $ touch ./volume/config/users_database.yml
6-4) $ vim ./volume/config/users_database.yml
6-5) 웹사이트에서 복사한 1~16라인 내용 붙여넣기 (CTRL + V)
7) Authelia 환경 설정 #5 - 다운로드한 users_database.yml을 개인 환경에 맞게 수정
// 예시의 굵게(bold) 설정된 부분을 개인 서버 환경에 맞게 설정하세요.
7-1) [2라인] user1: 값을 원하는 ID로 수정 (예: admin)
예) admin:
7-2) [3라인] displayname: 값을 원하는 name으로 수정 (예: admin)
예) displayname: "admin"
7-3) [4라인] password: 값에는 argon2.online 사이트에서 generate hash 생성한 "Output in Encoded Form" 내용 적용
예) password: "$argon2i$v=19$m=1024,t=1,p=8$eTQ3MXFia...(생략)...D1T9BZJjHA1Z+doxZrZYDgI"
7-4) [5라인] email: 값에 원하는 email 설정
예) email: admin@gmail.com
7-5) [9~13라인] 두 번째 계정 설정이 필요하다면, 위 과정을 참고하여 수정 진행
예) admin 계정 하나만 필요하다면, 9~13 라인은 아래 예시와 같이 # 주석 처리
# user2:
# displayname: "User Name 2"
# password: "...(생략)..." #generated at https://argon2.online/
# email: youremail2@gmail.com
# groups:
# - dev
이제 어려운 text modify 설정은 다 끝났습니다.
도커 컴포즈 명령으로 Authelia 컨테이너를 실행해 보겠습니다.
8) docker container 실행
$ sudo docker-compose up -d
$ sudo docker-compose ps
$ sudo docker-compose up -d
// 결과화면 생략 (처음 설치시 캡쳐하지 못함)

$ sudo docker-compose ps
  Name                Command                  State        Ports
-------------------------------------------------------------------
authelia   /app/entrypoint.sh --confi ...   Up (healthy)   9091/tcp
가이드 내용이 길어져서, 다음 내용은 3부로 분리합니다.
CONTINUE
PS. 본 포스팅이 도움이 되셨다면 소중한 리플로 후기 공유해주세요. 광고 클릭도 큰 도움이 됩니다.
'Guide_Tip_Tech > Oracle_Cloud_Free_Tire' 카테고리의 다른 글
| [OCI] Oracle Cloud Docker 셋팅 : 3-7. Vaultwarden 설치 및 NPM 연동 (0) | 2022.08.31 |
|---|---|
| [OCI] Oracle Cloud Docker 셋팅 : 3-6. Authelia 로그인에 구글 2FA 인증 적용 (1) | 2022.08.21 |
| [OCI] Oracle Cloud Docker 셋팅 : 3-5. Authelia 설치 및 NPM 연동 #4 (6) | 2022.08.21 |
| [OCI] Oracle Cloud Docker 셋팅 : 3-5. Authelia 설치 및 NPM 연동 #3 (0) | 2022.08.21 |
| [OCI] Oracle Cloud Docker 셋팅 : 3-5. Authelia 설치 및 NPM 연동 #1 (0) | 2022.08.21 |
| [OCI] Oracle Cloud Docker 셋팅 : 3-4. Nextcloud 설치 및 NPM 연동 (9) | 2022.08.10 |
| [OCI] Oracle Cloud Ampere A1 인스턴스 생성 및 Ubuntu 22.04 셋팅 가이드 (1) | 2022.06.24 |
| [OCI] Oracle Cloud Ampere A1 인스턴스 및 Ubuntu 22.04 셋팅 (text only) (0) | 2022.06.21 |
| [OCI] Oracle Cloud 인스턴스 응용 : 4-5. 블록 볼륨 용량 변경 (2) | 2022.04.12 |
| [OCI] Oracle Cloud 인스턴스 응용 : 4-4. 블록 볼륨 자동 마운트 설정 (0) | 2022.04.12 |
